Kid-Made Ornaments Light Up the Holidays!

Lighting Up the Holidays With Kid-Made Ornaments #mosswoodconnections #ornaments #kid-made #holidays

Kid-Made Ornaments

May your walls know joy, may every room hold laughter, and every window open to great possibility -- Mary Anne Radmacher

We are so excited to be taking part in 30 days of fantastic  Kid-Made Ornaments all made by children, along with full instructions for making them with your own children. Stop by Mum in the Mad House and check out all the fab holiday fun for kids!

This page contains affiliate links. Please visit our disclosure page for more information.

 Lighting Up the Holidays With Kid-Made Ornaments #mosswoodconnections #ornaments #kid-made #holidays

Light Up Kid-Made Christmas Decorations

The idea for the ornaments that we made came from an eight-year-old boy. This boy is having a lot of problems lately. His parents are divorced and not on the same page, he has learning disabilities that make school really difficult for him and so naturally he is having a hard time sleeping.

We had finished the work that we had to do so we went to my car so he could choose a game to play. (The trunk of my car looks like I have a traveling toy store.) Right away his eyes zoomed in on some LED tea lights and some model magic that I had just added to my craft supply bag. He grabbed them, his eyes lit up and he asked, “Can I have these?”

I realized that he wanted the tea lights to put by his bed and the Model Magic provides a wonderful sensory break. So we got to work crafting and creating and that’s how our Christmas decorations were born.

 Lighting Up the Holidays With Kid-Made Ornaments #mosswoodconnections #ornaments #kid-made #holidays

Materials You Need to Make a Light Up Kid-Made Christmas Decoration:

Instructions on How to Light Up Your Holiday Decorations!

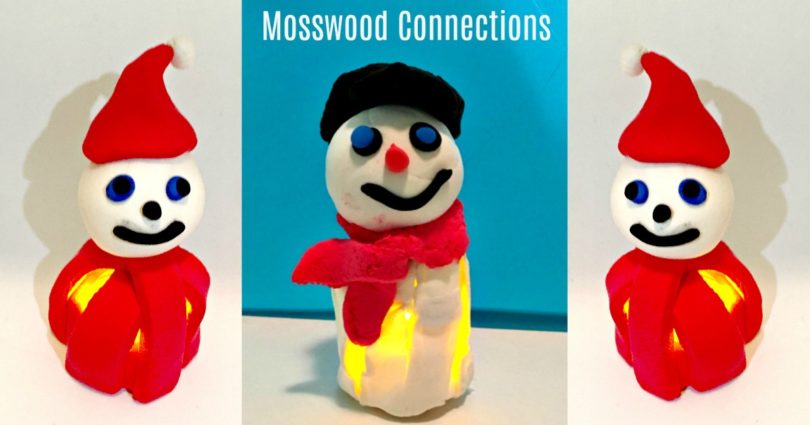
Method #1: Making a Snowman! (This method proved to be difficult so we recommend Method #2)

  • Roll out the Model Magic and cut into strips.
 Lighting Up the Holidays With Kid-Made Ornaments #mosswoodconnections #ornaments #kid-made #holidays
  • Blow up a balloon (we used a water balloon.) and tape the balloon onto the LED tea light. Wrap the strips over the balloon and tuck onto the bottom of the tea light making sure not to cover the on/off switch. This seemed like a good idea at the time. 
  • Then roll a ball for the snowman’s head and decorate. This is where we ran into a problem. The balloon popped and the snowman’s body got a little squished.
Lighting Up the Holidays With Kid-Made Ornaments #mosswoodconnections #ornaments #kid-made #holidays

Method #2: Making a Light Up Gnome Christmas Decoration

  • Roll out the Model Magic as we did for the snowman but we decided to skip the balloon this time.
  • Wrap one of the Model Magic strips around the base of the LED tea light.
  • Take the strips of Model Magic and attach one end of the base, arc the strip over the tea light. Repeat with six strips until you have formed the body. Roll the Model Magic into a ball for the head attach to the body and decorate.
Lighting Up the Holidays With Kid-Made Ornaments #mosswoodconnections #ornaments #kid-made #holidays

The boy who started this project in the first place was super excited about his new light up Christmas decorations. He had one to put in both of his homes. Hopefully, they will cheer him up and help him sleep better through the night.

Lighting Up the Holidays With Kid-Made Ornaments #mosswoodconnections #ornaments #kid-made #holidays

Tags

One comment

Leave a Reply

Your email address will not be published.

top
×

Subscribe for latest updates

Get all the latest exciting news from Mosswood Connections!